Cleaning a Cabin After Winter: Hantavirus-Safe Opening Protocol
Before You Arrive
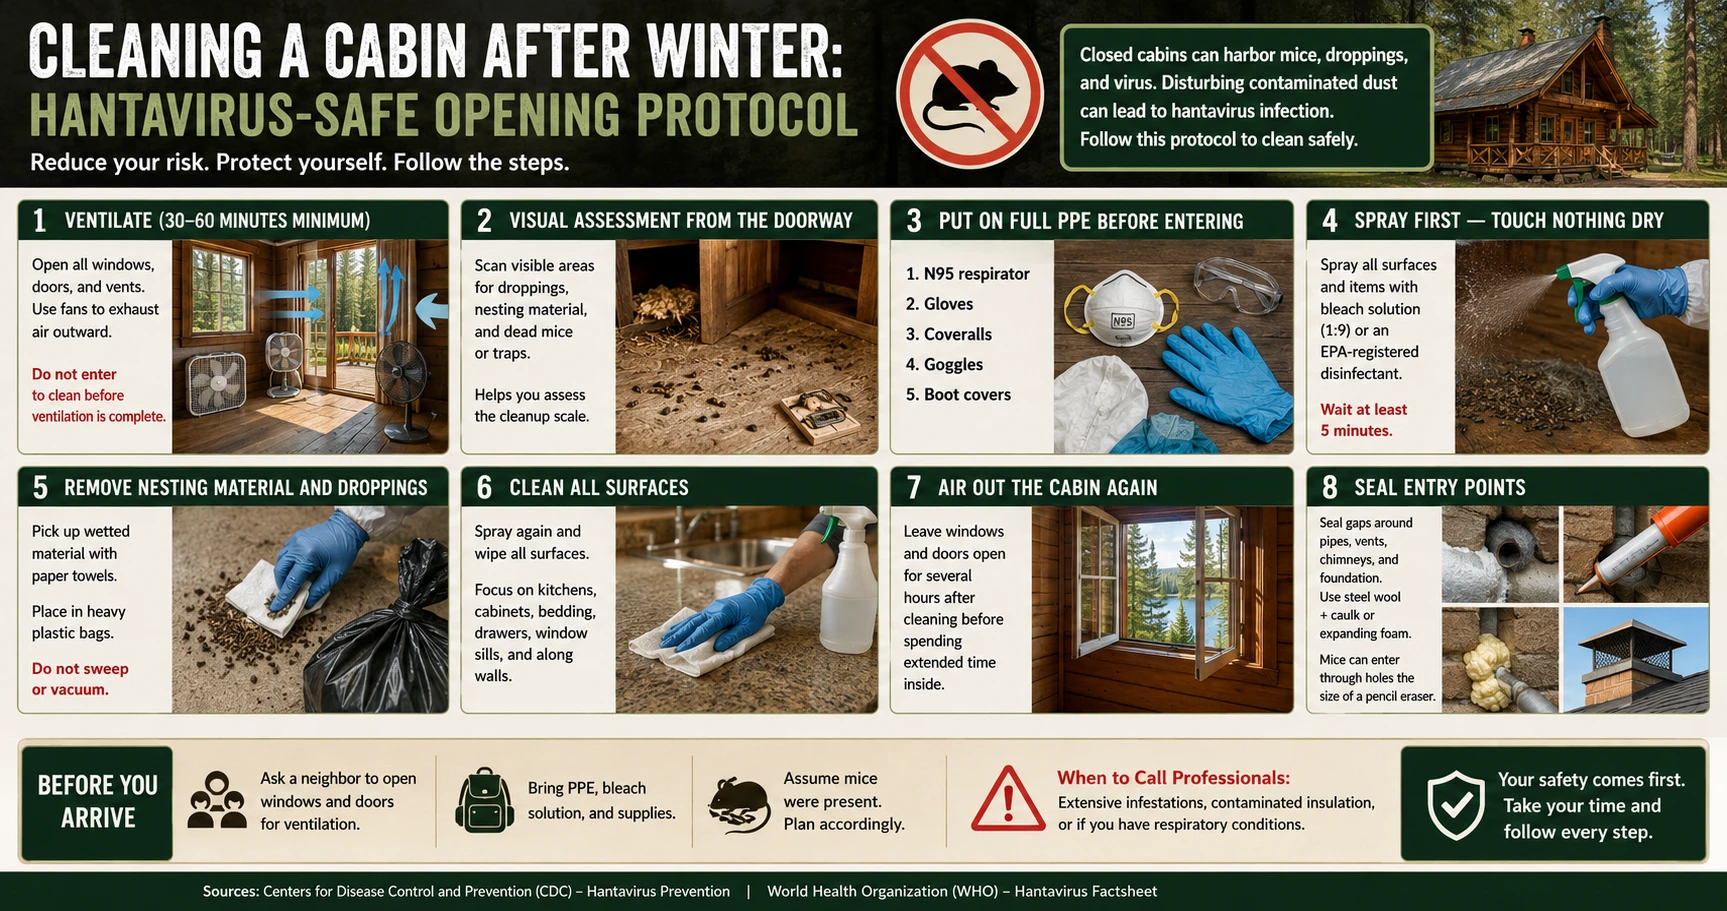
If possible, do these things before opening the cabin for the first time after winter:
- Send a neighbor or contact ahead to open windows and doors for ventilation before you arrive. Even 30 minutes of pre-ventilation before your inspection helps.
- Bring PPE with you — N95 respirators, nitrile gloves, disposable coveralls, and a spray bottle with bleach solution. Do not assume you can get these locally on arrival.
- Assume mice were present. In rural areas with deer mouse populations, a cabin closed for winter almost certainly had rodent visitors. Approach with that assumption.
The single most common mistake is arriving at a closed cabin and immediately turning on the furnace or wood stove. Heat circulates the air in the cabin — and whatever dried material is in it. Ventilate first, every time.
CDC investigation reports of confirmed HPS cases consistently describe the same pattern: the exposure happened in the first minutes after arrival, before the owner had ventilated the space or put on protection. One documented West Virginia case involved a property owner who found mice upon arrival, dealt with them immediately, and used a standard vacuum to clean the area where rodents had been active — all before airing the cabin out. The protocol matters, and the order matters.
Step 1: Ventilate Before Entry (30–60 Minutes Minimum)
Open all windows, doors, and any accessible vents. If the cabin has a fireplace damper, open it. Position box fans if available to exhaust air outward.
If the cabin smells stale or musty when you crack the door, that's not just winter damp. It often reflects months of accumulated rodent activity — urine, nesting material, droppings — in an unventilated space. Don't go in yet. Let it breathe.
Do not:
- Enter to clean before ventilation is complete
- Run a forced-air heating system before the space has been inspected — this can spread particles through the ductwork
- Use a leaf blower or fan blowing inward — this stirs up settled particles
Step 2: Visual Assessment From the Doorway
Before full entry, scan the visible areas from doorways and exterior windows:
- Look for obvious dropping accumulations on counters, floors, and shelves
- Note any nesting material visible under furniture or in corners
- Check whether dead mice or snap traps are visible
This assessment helps you understand the scale of the cleanup and decide whether professional help is warranted before proceeding.
Step 3: Put on Full PPE Before Entering
At the door threshold, before stepping inside:
- N95 respirator — fitted and sealed
- Nitrile or rubber gloves
- Disposable coveralls (or clothes designated for cleanup)
- Safety goggles
- Boot covers if you have them
Step 4: Spray First — Touch Nothing Dry
Before moving any item or cleaning any surface, spray it with bleach solution (1 part bleach to 9 parts water) or an EPA-registered disinfectant.
Work systematically — one room at a time, from back to front. Spray:
- All horizontal surfaces with visible droppings
- The floor area surrounding dropping concentrations
- Any nesting material
- The insides of cabinets before opening drawers
- Under furniture before moving it
Wait at least 5 minutes after spraying before disturbing treated material.
Step 5: Remove Nesting Material and Droppings
Pick up wetted droppings and nesting material with paper towels. Place directly into heavy plastic bags. Seal and double-bag.
Most people's first instinct is to grab a broom. That's the dangerous move. Sweeping sends a fine dust cloud of dried material directly into the air you're breathing — it's the most reliable way to inhale whatever the mice left behind. Same with a vacuum: unless it's HEPA-filtered, the exhaust disperses particles right back into the room. Wet first, pick up second.
Step 6: Clean All Surfaces
After removing visible contamination, spray all surfaces a second time and wipe down with paper towels. Pay particular attention to:
- Kitchen counters and insides of cabinets
- Bedding, mattresses, and upholstered furniture
- The insides of drawers
- Window sills and ledges where mice travel
- The floor, especially along walls
For bedding that cannot be laundered hot: spray with disinfectant and allow to dry fully before use. Bedding from heavily contaminated rooms should be discarded.
Step 7: Air Out the Cabin Again
After surface cleaning is complete, leave the cabin ventilating for several hours with windows and doors open before spending extended time inside.
Step 8: Seal Entry Points
Before closing the cabin at the end of your stay, or before leaving for an extended period:
- Inspect the exterior for gaps around pipes, utility lines, and foundation penetrations
- Seal with steel wool packed tightly, then covered with caulk or expanding foam
- Check the roof line, vents, and chimney cap
- Replace any damaged window or door screens
Mice can enter through holes the size of a pencil eraser. Thorough sealing significantly reduces re-entry.
Official Sources
- CDC: Cleaning Up After Rodents — official cabin opening and cleanup protocol
- CDC Hantavirus Prevention — prevention guidelines for seasonal structures
Sources & References
- CDC — Centers for Disease Control and Prevention
Hantavirus: Prevention, Symptoms & Control
- cdc.gov — Cleaning Up
https://www.cdc.gov/hantavirus/prevention/cleaning-up.html
- cdc.gov — Mmwr
https://www.cdc.gov/mmwr/
- WHO — World Health Organization
Hantavirus Disease: Fact Sheet
All health claims on this page are verified against the primary sources listed above. View our Editorial Policy
Frequently Asked Questions
Medical Disclaimer
The information on this page is for educational purposes only and is not medical advice. If you believe you may have been exposed to hantavirus or are experiencing symptoms, contact a qualified healthcare professional or local health authority immediately.