Cleaning Mouse Droppings in the Attic: Why Enclosed Spaces Are Higher Risk
How Most People Find This
You move a storage box, insulation shifts, and suddenly there are dozens of small black pellets scattered across the floor. Or you smell something — that distinct ammonia-and-dust smell — and go up with a flashlight to check. What you find is usually worse than you expected.
Attics are where mouse infestations go undetected the longest. Warm in winter, full of nesting material, rarely disturbed. By the time most people discover the problem, droppings have accumulated over months or years, insulation is thoroughly contaminated, and the space has been sealed up the whole time — concentrating whatever was in the air.
That's what makes attic cleanup meaningfully higher risk than cleaning a kitchen or bathroom. The particles don't dissipate. They sit in the still air until you start moving things around.
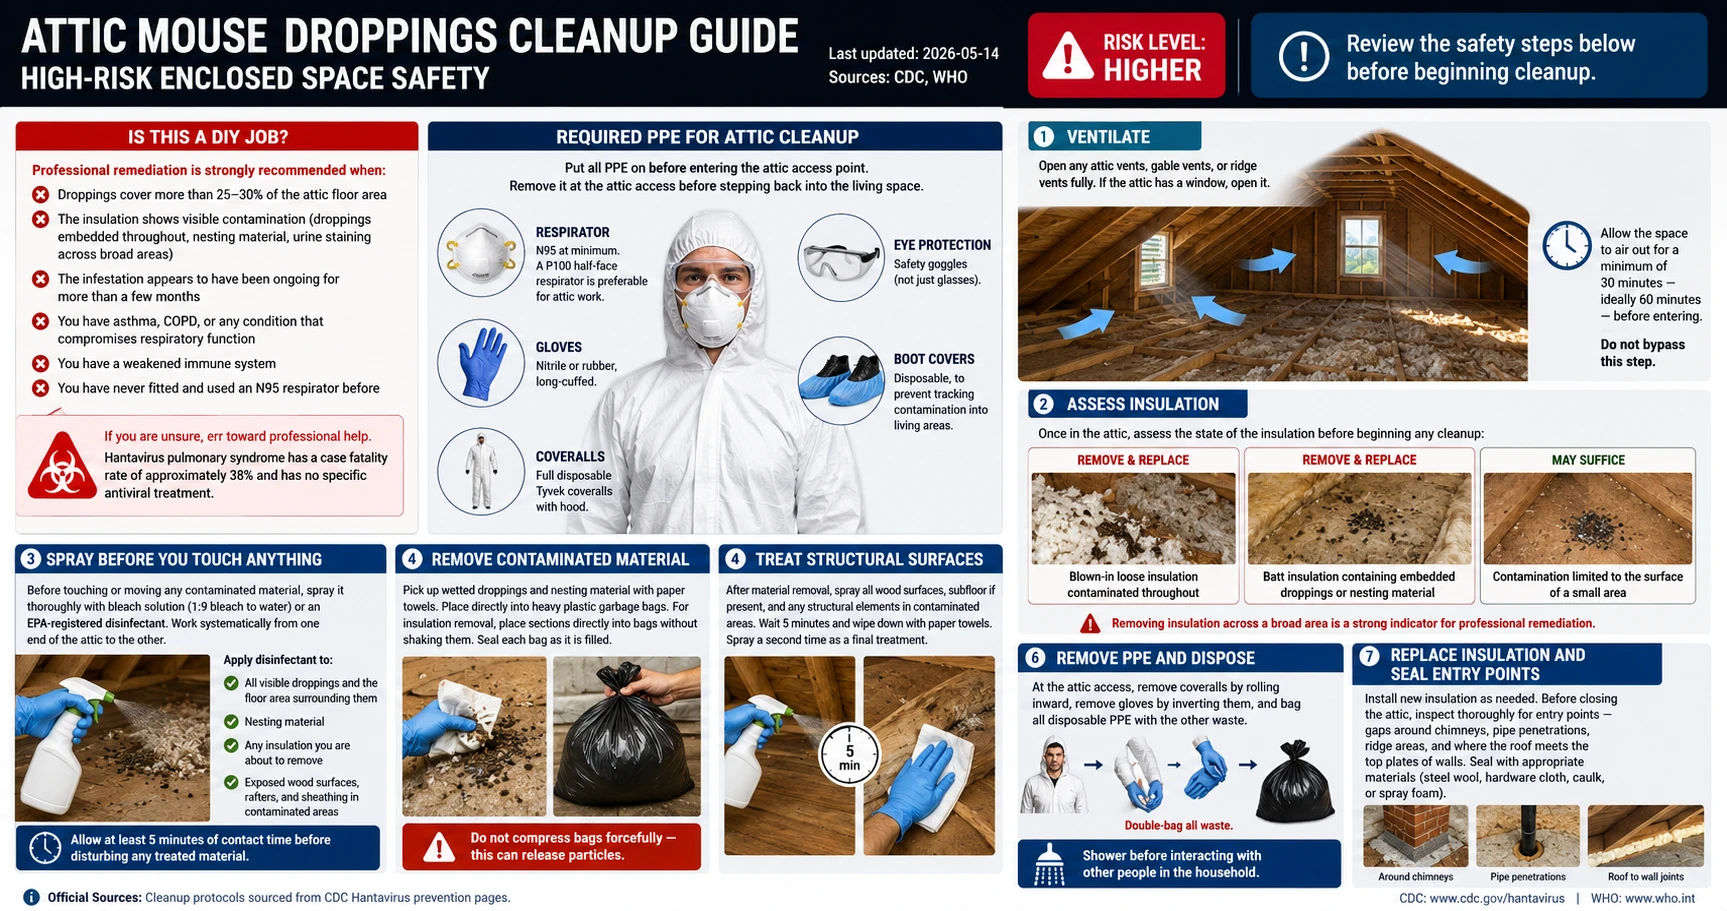
Is This a DIY Job?
Be honest about this before you start. Professional remediation is the right call when:
- Droppings cover more than 25–30% of the attic floor area
- Insulation shows visible contamination throughout — not just surface droppings
- The infestation appears to have been ongoing for many months
- You have asthma, COPD, or any respiratory or immune condition
- You've never fitted and used an N95 or P100 respirator before
If you're unsure about any of these, lean toward calling a professional. Attics don't give you much margin for error.
What People Usually Do Wrong
The most common mistake is moving things first and thinking about protection second. Someone sees the droppings, starts shifting boxes to assess the damage, and stirs up dust before they've put on a mask or opened any vents. By the time they realize what they're dealing with, the exposure has already happened.
The second mistake is treating it like a regular cleaning job — sweeping dry droppings, using a shop vac, or wiping surfaces with a multi-purpose spray. None of those work here.
The sequence that matters: ventilate first, gear up before you touch anything, wet the material before you disturb it.
Required PPE — More Than Usual
Attic work requires a step up from the standard cleanup gear:
- Respirator: N95 at minimum. A P100 half-face respirator is preferable — attics accumulate more particulate than open rooms.
- Gloves: Nitrile or rubber, long-cuffed.
- Coveralls: Full disposable Tyvek coveralls with hood. Attics are hot and dusty; you'll want full coverage.
- Eye protection: Safety goggles, not just glasses.
- Boot covers: Disposable, to prevent tracking contamination back into the living space.
Put all PPE on before you enter the attic hatch. Remove it at the hatch before stepping back in.
Step 1: Ventilate — Then Wait
Open every attic vent, gable vent, and ridge vent fully. If there's an attic window, open it. Allow the space to air out for at least 30 minutes, ideally 60. The air in a sealed attic after a mouse infestation is not clean — you want as much of it exchanged as possible before you go in.
Don't shortcut this step. The whole point is reducing what you'll breathe before you start disturbing the surface.
Step 2: Assess Before You Touch Anything
Once you're in with PPE on, look before you start. Check:
- Volume and distribution of droppings across the floor
- Condition of insulation — surface contamination only, or embedded throughout
- Old nesting trails — runs along joists where mice traveled repeatedly
- Urine staining (a UV flashlight shows what's invisible under normal light)
This assessment changes what comes next. Targeted droppings on a small area of flooring is a different project from contaminated blown-in insulation across half the attic.
Contaminated insulation — blown-in or batt — cannot be disinfected. It needs to come out. If that's what you're looking at across a significant area, that's a professional job.
Step 3: Spray Everything Before You Move Anything
This is the step people skip when they're in a hurry. Before touching or moving any contaminated material, spray it thoroughly with bleach solution (1 part bleach to 9 parts water) or an EPA-registered disinfectant.
Work systematically — spray droppings, nesting material, any insulation you're about to remove, and the floor around contaminated areas. The goal is visibly wet. Then wait 5 minutes before disturbing anything.
That 5-minute wait is not optional. Contact time is what inactivates the virus.
Step 4: Remove Contaminated Material
Pick up wetted droppings and nesting material with paper towels. Bag directly into heavy plastic bags. For insulation, place sections into bags without shaking them. Seal each bag as it fills.
Don't compress bags forcefully — that can force particles out through gaps in the bag.
Step 5: Treat Structural Surfaces
After removing loose material, spray all wood surfaces — joists, subfloor, rafters, sheathing in contaminated areas. Wait 5 minutes, wipe with paper towels, spray a second time.
Pay attention to the areas along joists where mice ran repeatedly. Those paths accumulate urine over time even where droppings aren't obvious.
Step 6: Remove PPE and Dispose
At the attic hatch, remove coveralls by rolling inward to contain the outer surface. Invert gloves as you pull them off. Bag all disposable PPE with the other waste. Double-bag everything and move to an outdoor trash container the same day.
Shower before going through the rest of the house.
Step 7: Replace Insulation and Seal Entry Points
Install new insulation where needed. Before closing the attic, inspect for how they got in — gaps around chimneys, pipe penetrations, ridge areas, where roof meets the top plates of walls. Mice exploit gaps smaller than you'd expect.
Seal with steel wool packed tightly into gaps, then covered with caulk, hardware cloth, or spray foam. Steel wool alone won't hold long-term; the outer seal keeps it in place.
If You Already Went Up Without a Mask
Ventilate the attic immediately and leave. Open everything, set up a fan pushing air out if you have one, and don't go back in for at least 30 minutes. Then go back in with proper PPE and do the wet disinfection protocol from the beginning.
Whether this represents significant exposure depends on what you disturbed and for how long. Moving a single box in a briefly ventilated space is a different situation from spending 40 minutes shifting insulation in a sealed attic. If you were working in an enclosed attic without respiratory protection for an extended period, that's worth noting.
Watch for symptoms — fever, severe muscle aches, fatigue — for up to 8 weeks. If symptoms develop within that window after an attic cleanup, mention the exposure to your doctor. Hantavirus has a long incubation period, and exposure history is critical context for diagnosis.
Official Sources
- CDC: Cleaning Up After Rodents — official cleanup protocol
- CDC Hantavirus Prevention — prevention and disinfection guidelines
Sources & References
- CDC — Centers for Disease Control and Prevention
Hantavirus: Prevention, Symptoms & Control
- cdc.gov — Cleaning Up
https://www.cdc.gov/hantavirus/prevention/cleaning-up.html
- WHO — World Health Organization
Hantavirus Disease: Fact Sheet
All health claims on this page are verified against the primary sources listed above. View our Editorial Policy
Frequently Asked Questions
Medical Disclaimer
The information on this page is for educational purposes only and is not medical advice. If you believe you may have been exposed to hantavirus or are experiencing symptoms, contact a qualified healthcare professional or local health authority immediately.