RV Mouse Contamination Guide: How to Find It, Clean It, and Keep Mice Out
Why RVs Are High-Risk Environments
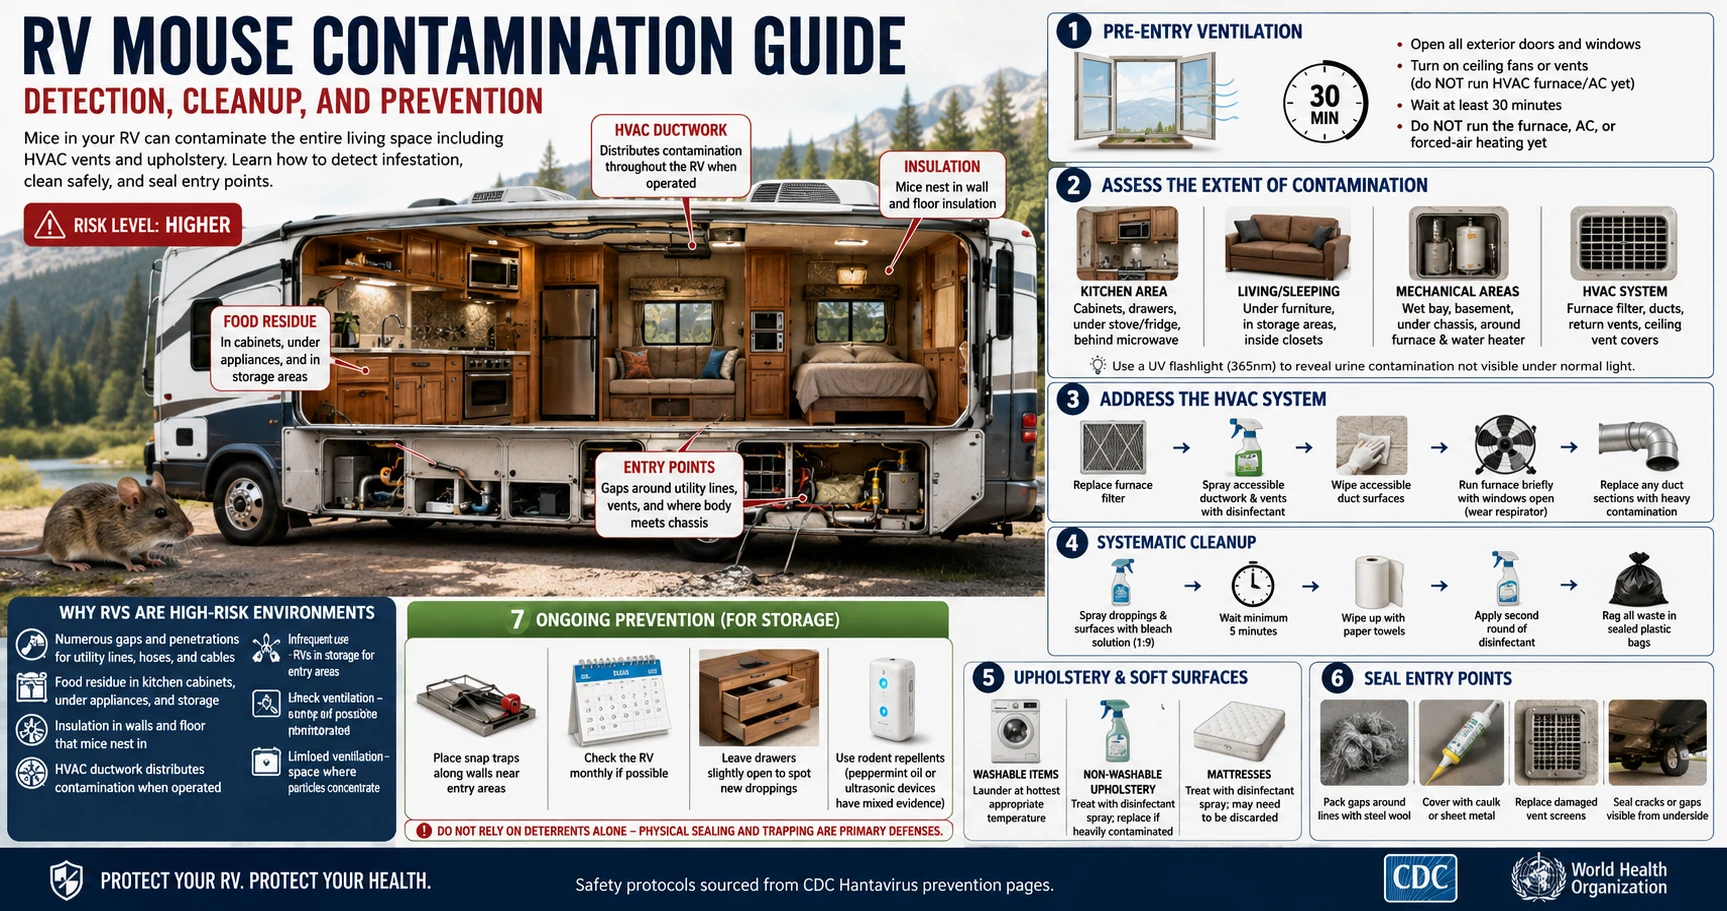
RVs combine several factors that make them particularly prone to mouse infestation and difficult to clean out safely:
- Numerous gaps and penetrations where utility lines, hoses, and cables enter the body
- Food residue in kitchen cabinets, under appliances, and in storage compartments
- Insulation in walls and floor that mice nest in
- HVAC ductwork that spreads contamination throughout the living space when operated
- Infrequent use — RVs in storage for months are not monitored, allowing infestations to develop without detection
- Limited ventilation compared to a house — a small RV is an enclosed space where airborne particles concentrate
The combination means that by the time an owner notices droppings, mice have often been living inside for weeks — nesting in insulation, running through ductwork, leaving contamination in areas that are hard or impossible to reach without disassembly.
Step 1: Pre-Entry Ventilation
Before entering a stored RV you suspect has mice:
- Open all exterior doors and windows
- Turn on any ceiling fans or vents (do not run the HVAC furnace/AC yet — this can spread contamination)
- Wait at least 30 minutes before entering
- Do not run the furnace, air conditioner, or forced-air heating until the HVAC system has been inspected and cleaned
The most common mistake at this stage: turning on the furnace to warm up the RV before doing anything else. This pushes contaminated air from the ducting through every vent in the vehicle before you've had a chance to assess or clean anything.
Step 2: Assess the Extent of Contamination
With PPE on (N95 respirator, nitrile gloves), check all areas:
Kitchen area:
- Inside all cabinets and drawers
- Under the stove and refrigerator
- Behind the microwave
- Inside any food storage areas
Living/sleeping area:
- Under furniture and cushions
- In storage compartments under beds or bench seats
- Inside closets
Mechanical areas:
- Wet bay (plumbing access)
- Basement storage compartments
- Under-chassis access areas
- Around the furnace and water heater
HVAC system:
- Furnace filter and adjacent ducting
- Return air vents
- Ceiling vent covers
Behind the refrigerator and around the furnace are typically the highest-contamination zones — rodents are drawn to warmth, and these areas are where nesting concentrates.
A UV flashlight (365nm) helps reveal urine contamination not visible under normal light.
Step 3: Address the HVAC System
The HVAC system in an infested RV requires specific attention:
- Replace the furnace filter before running the system
- Spray the interior of accessible ductwork and return air vents with disinfectant
- Wipe accessible duct surfaces with disinfectant-soaked paper towels
- Run the furnace briefly with all windows open to flush the system (wear respirator)
- Replace any duct sections that show heavy contamination
If a urine smell returns after cleaning — or appears the first time you run the heat — that usually means contamination is deeper in the ducting or inside wall insulation than surface cleaning can reach. At that point, professional remediation or duct section replacement is worth considering.
Step 4: Systematic Cleanup
Follow standard mouse dropping cleanup protocol in every area:
- Spray droppings and contaminated surfaces with bleach solution (1:9)
- Wait minimum 5 minutes
- Wipe up with paper towels
- Apply a second round of disinfectant
- Bag all waste in sealed plastic bags
Pay particular attention to:
- Drawer and cabinet interiors
- The area around and under the stove
- The space behind the refrigerator
- Any nesting material found in insulation or storage areas
Step 5: Upholstery and Soft Surfaces
Fabric surfaces in RVs (cushions, mattresses, curtains) that show evidence of contamination should be:
- Washable items: Laundered at the hottest appropriate temperature
- Non-washable upholstery: Treated with disinfectant spray; heavily contaminated items should be replaced
- Mattresses: Treated with disinfectant spray; a contaminated mattress is difficult to fully disinfect and may need to be discarded
Step 6: Seal Entry Points
After cleanup, inspect and seal all potential entry points:
- Gaps around water, electrical, and sewer line penetrations through the floor — pack with steel wool, then cover with caulk or sheet metal
- Gaps at the front where the body meets the chassis
- Vents with damaged screens — replace mesh
- Any cracks or gaps in the floor or walls visible from the underside
Step 7: Ongoing Prevention
For an RV in storage:
- Place snap traps along walls near entry areas
- Check the RV monthly if possible
- Leave drawers slightly open so you can easily spot new droppings on inspection
- Consider a battery-powered pest repellent device (evidence is mixed, but some users find them effective as part of a layered approach)
Official Sources
- CDC: Cleaning Up After Rodents — RV cleanup and sanitization protocol
- CDC Hantavirus Prevention — prevention guidelines for vehicles and enclosed spaces
Sources & References
- CDC — Centers for Disease Control and Prevention
Hantavirus: Prevention, Symptoms & Control
- cdc.gov — Cleaning Up
https://www.cdc.gov/hantavirus/prevention/cleaning-up.html
- WHO — World Health Organization
Hantavirus Disease: Fact Sheet
All health claims on this page are verified against the primary sources listed above. View our Editorial Policy
Frequently Asked Questions
Medical Disclaimer
The information on this page is for educational purposes only and is not medical advice. If you believe you may have been exposed to hantavirus or are experiencing symptoms, contact a qualified healthcare professional or local health authority immediately.