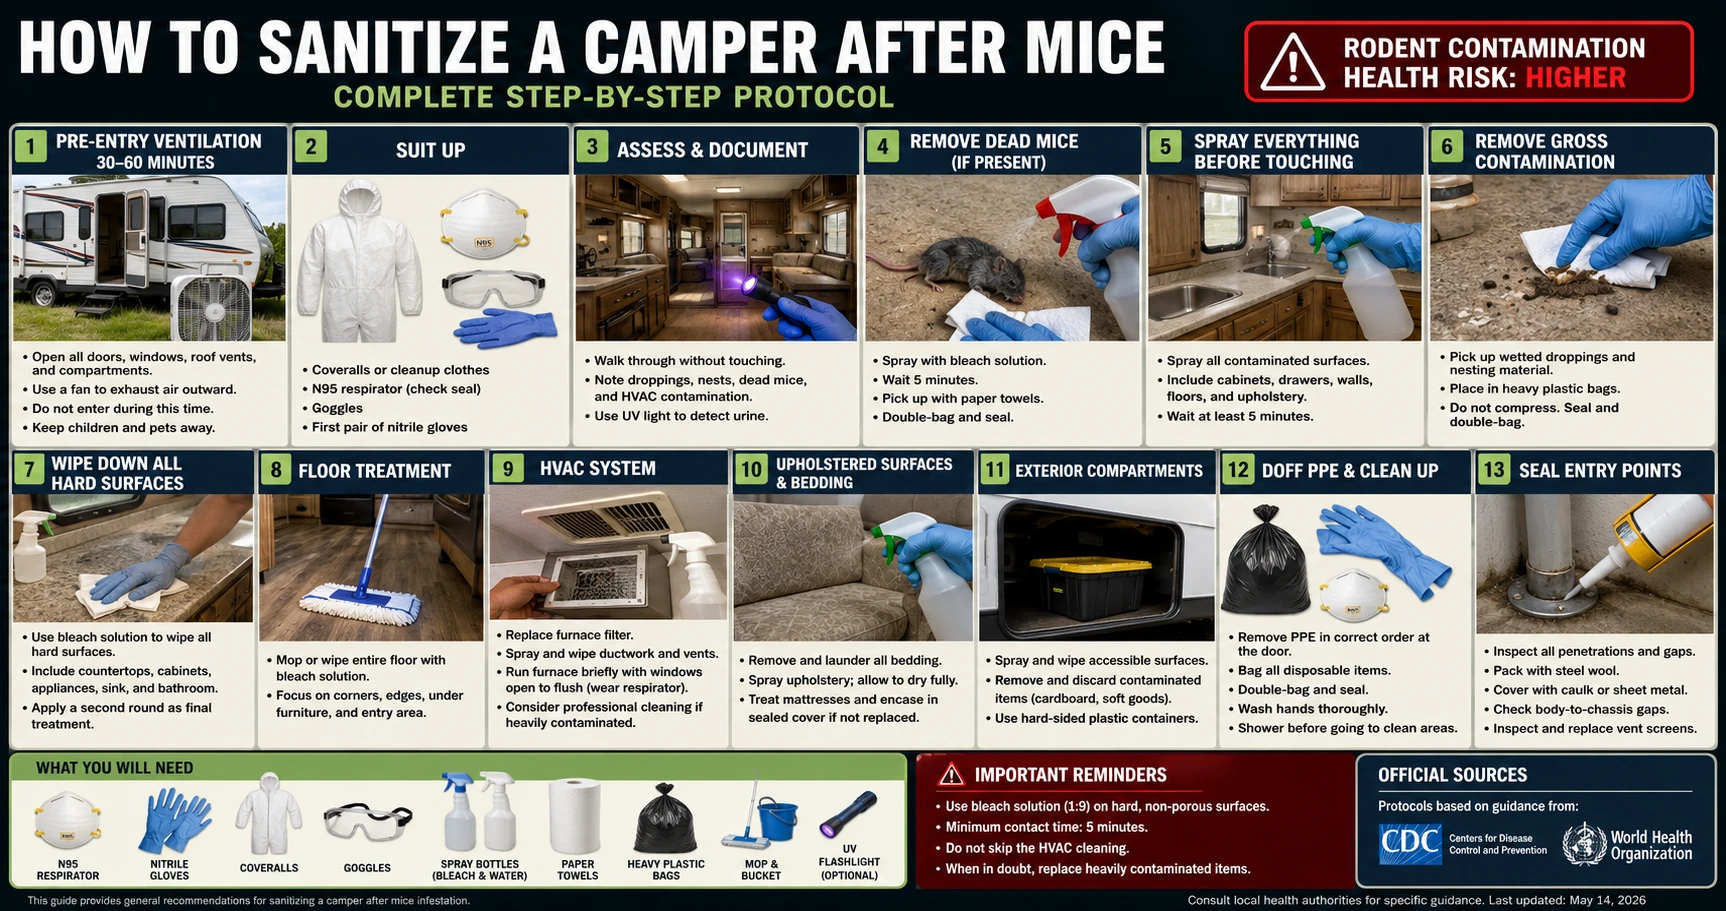
How to Sanitize a Camper After Mice: The Full Cleanup Sequence
The most common mistake happens before cleanup even starts: owners arrive, notice the stale smell, and immediately run the furnace to warm the camper up. This blows whatever is inside the ductwork — droppings, urine particles, nesting debris — through every vent before anything has been disinfected. Sequence matters more than products. Follow the phases in order.
What You Will Need
Before beginning, gather:
- N95 respirator (not a dust mask)
- Nitrile or rubber gloves — two pairs
- Disposable coveralls or clothes designated for cleanup
- Safety goggles
- Spray bottles — one with bleach solution (1:9), one with clean water
- Paper towels (multiple rolls)
- Heavy plastic garbage bags (multiple)
- Mop and bucket, or disposable mop pads
- UV flashlight (optional but helpful for urine detection)
Phase 1: Pre-Entry Ventilation (30–60 Minutes)
Open all camper doors, windows, roof vents, and basement storage compartments. Position a box fan at the door to exhaust air outward if available.
Do not:
- Run the furnace or air conditioner yet
- Enter while ventilation is in progress
- Allow children or pets near the vehicle during this phase
Phase 2: Suit Up
At the door, before entering, put on all PPE:
- Coveralls or cleanup clothes
- N95 respirator — check seal
- Goggles
- First pair of nitrile gloves
Phase 3: Assess and Document
Walk through the camper without touching anything. Note:
- Where droppings are concentrated
- Any nesting sites
- Any dead mice (these need to be removed first with spray-wait-remove protocol)
- Any evidence in HVAC vents or ductwork
Use the UV flashlight to scan horizontal surfaces in the dark for urine contamination.
The worst contamination is usually not where you look first. Behind the refrigerator, around the furnace cabinet, inside under-bed storage compartments, and any dark enclosed space that sat undisturbed — these areas draw nesting far more than open countertops.
Phase 4: Remove Dead Mice (if present)
Before general cleanup, handle any dead mice individually:
- Spray the mouse and surrounding area with bleach solution
- Wait 5 minutes
- Pick up with paper towels
- Double-bag and seal
Phase 5: Spray Everything Before Touching
Working from front to back, top to bottom, spray all contaminated surfaces with bleach solution before touching them:
- Cabinet interiors and drawer interiors
- Countertops
- All visible droppings and the surrounding area
- Any nesting material
- Floors along walls where mice travel
- Upholstered surfaces that show contamination
Wait at least 5 minutes before disturbing treated material.
Phase 6: Remove Gross Contamination
Use paper towels to pick up wetted droppings and nesting material. Place directly into heavy plastic bags. Do not compress bags forcefully — seal and bag in a second layer when a bag is full.
Phase 7: Wipe Down All Hard Surfaces
Apply bleach solution and wipe all hard surfaces:
- All countertops, tables, and shelves
- Interior walls within reach
- Cabinet door interiors and exteriors
- Appliance surfaces (outside of refrigerator, microwave, stove)
- Toilet, sink, and bathroom surfaces
Apply a second round of disinfectant as a final treatment.
Phase 8: Floor Treatment
Mop or wipe the entire floor with bleach solution. Pay special attention to:
- Corners and edges
- Areas under furniture and appliances
- The area around the entry door
Phase 9: HVAC System
Do not skip this step. A contaminated HVAC system will redistribute particles every time the furnace or AC runs:
- Replace the furnace filter
- Spray accessible ductwork and return air vents with disinfectant
- Wipe accessible duct surfaces
- Run the furnace briefly with all windows open to flush the system — wear your respirator during this step
- If ductwork shows heavy contamination, consider having it professionally cleaned or replaced
If a rodent smell comes back the first time you run the heat after cleanup, contamination is deeper inside the ductwork or behind insulation than surface cleaning can reach. Stop using the furnace and have the duct sections inspected — running it repeatedly won't clear the smell and will keep redistributing particles.
Phase 10: Upholstered Surfaces and Bedding
- Remove all bedding and launder at the highest appropriate temperature
- Spray upholstered cushions and seating with disinfectant; allow to dry fully
- If a mattress has visible contamination, spray, allow to dry, then encase in a sealed mattress cover
Phase 11: Exterior Compartments
Don't forget basement storage compartments and wheel well areas:
- Spray and wipe accessible surfaces
- Remove and discard any contaminated cardboard or soft goods
- Replace with hard-sided plastic storage containers
Phase 12: Doff PPE and Clean Up
At the camper door (before stepping onto clean ground):
- Remove boot covers
- Peel off outer gloves, turn inside out
- Roll coveralls downward and step out — contaminated surface folds inside
- Remove goggles — handle by frame
- Remove respirator — handle by straps only, do not touch front
Bag all disposable PPE with the other waste. Double-bag and seal.
Wash hands thoroughly. Shower before spending time in a clean environment.
Phase 13: Seal Entry Points
After cleanup is complete:
- Inspect all penetrations where lines and cables enter the floor and walls
- Pack gaps with steel wool; cover with caulk or sheet metal
- Check the area where the body meets the chassis for gaps
- Inspect and replace any damaged vent screens
Official Sources
- CDC: Cleaning Up After Rodents — official sanitization protocol
- CDC Hantavirus Prevention — prevention and disinfection guidelines
Sources & References
- CDC — Centers for Disease Control and Prevention
Hantavirus: Prevention, Symptoms & Control
- cdc.gov — Cleaning Up
https://www.cdc.gov/hantavirus/prevention/cleaning-up.html
- WHO — World Health Organization
Hantavirus Disease: Fact Sheet
All health claims on this page are verified against the primary sources listed above. View our Editorial Policy
Frequently Asked Questions
Medical Disclaimer
The information on this page is for educational purposes only and is not medical advice. If you believe you may have been exposed to hantavirus or are experiencing symptoms, contact a qualified healthcare professional or local health authority immediately.