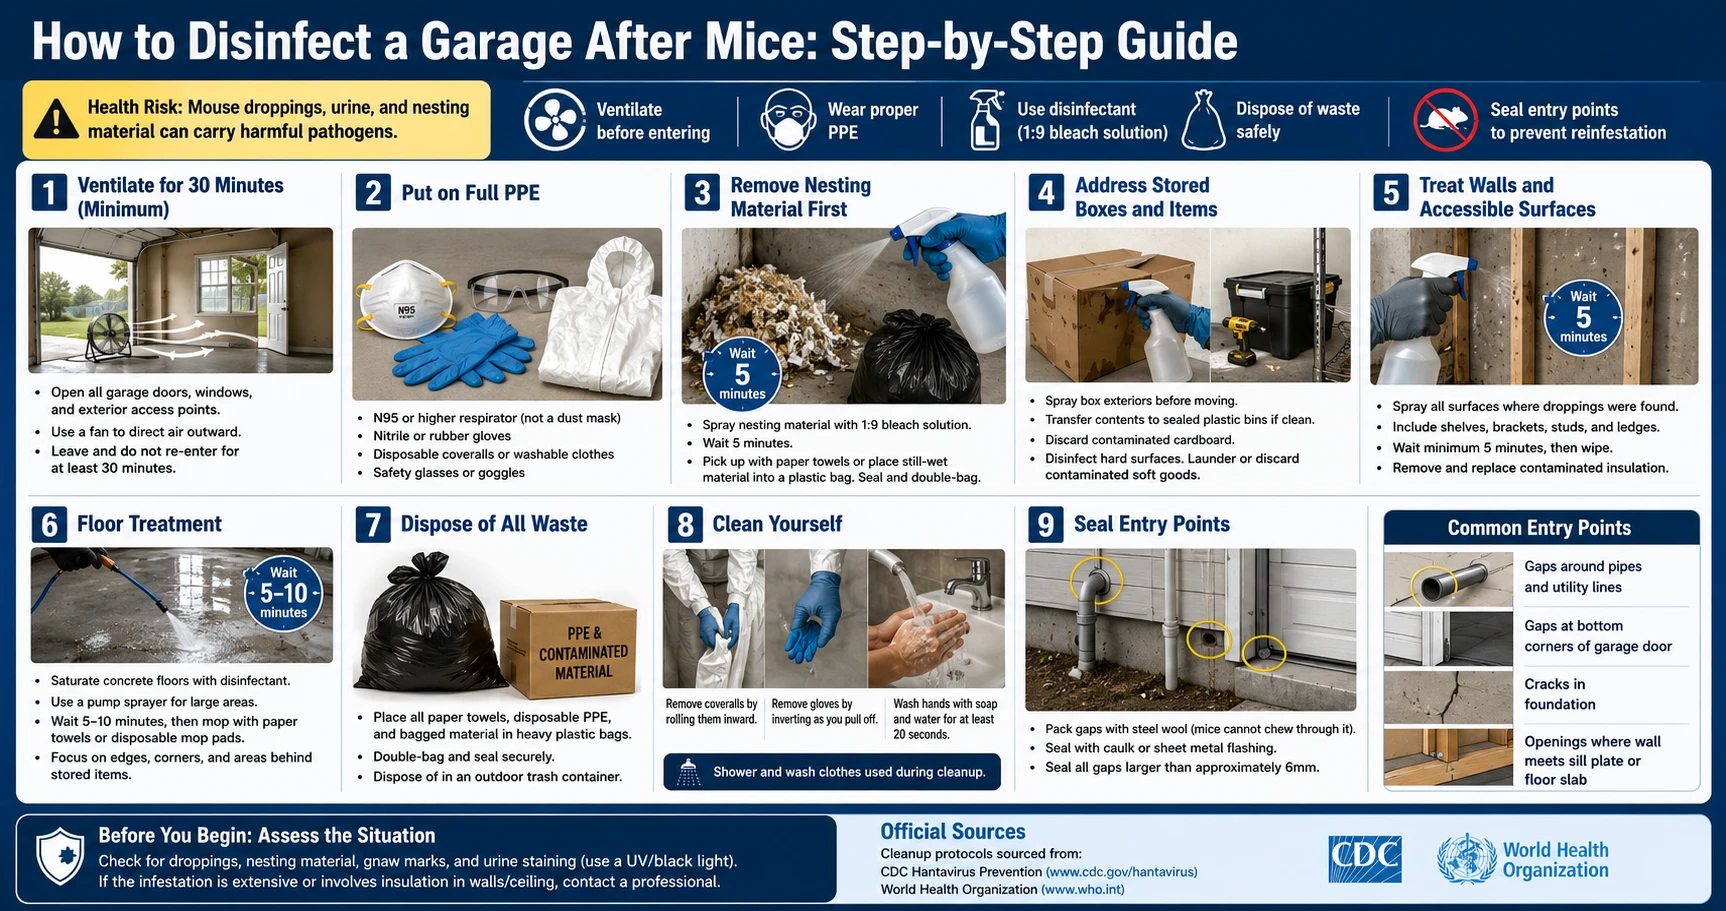
How to Disinfect a Garage After Mice: Step-by-Step Guide
What You're Dealing With
You open the garage — maybe you noticed a smell, maybe you pulled out a storage box and found droppings behind it. Garages are one of the more common places mice settle in because they offer everything: insulation to nest in, boxes to chew through, food scraps, and months of being undisturbed.
Cleaning a garage after mice is messier than cleaning a kitchen. The space is usually poorly ventilated, the floor is porous concrete that soaks up contaminated material, and mice tend to nest behind stored items where you can't easily see the extent of it. A few scattered droppings near the door is a different situation from finding a nest packed behind a row of cardboard boxes — take a moment to assess before you start.
The instinct most people have is to grab a broom or shop vac. Don't. Sweeping or vacuuming dry droppings sends contaminated dust into the air. The right sequence is: ventilate, gear up, wet the material before you touch it.
Step 1: Ventilate for 30 Minutes Before Entering
Open all garage doors, windows, and any exterior access points. If you have a box fan, position it to push air outward, not just circulate it. Leave and do not re-enter for at least 30 minutes — longer if the space is small or there's heavy contamination. This is not optional.
Step 2: Assess Before You Touch Anything
Once ventilated, walk through with your PPE on and look before you start cleaning. Check for:
- Volume and distribution of droppings
- Nesting material — shredded paper, insulation scraps, fabric
- Gnaw marks on boxes, wiring, or structural elements
- Urine staining (a UV/black light reveals what the eye misses)
If contamination extends into wall insulation or the ceiling, or if there's a large active nest, that's professional remediation territory. The steps below are for a contained cleanup you can handle yourself.
Step 3: Gear Up Fully
Before touching anything:
- N95 respirator — not a dust mask, which won't filter fine particles
- Nitrile or rubber gloves
- Disposable coveralls, or clothes you'll wash immediately at high heat
- Safety glasses or goggles if you're working overhead or disturbing dusty areas
Put everything on before you start handling contaminated material. Not midway through.
Step 4: Remove Nesting Material First
Find all nesting sites — behind stored items, inside boxes, in wall cavities if accessible. Spray nesting material thoroughly with bleach solution (1 part bleach to 9 parts water) until it's visibly wet. Wait 5 minutes, then pick up with paper towels or ease still-wet material directly into a plastic bag. Seal and double-bag immediately.
Don't try to scoop up dry nesting material. The dust in old nesting is the hazard.
Step 5: Deal With Boxes and Stored Items
Cardboard boxes are a problem. Mice nest in them, urinate on them, and the material is porous — you can't disinfect cardboard. Spray the exterior before moving any box. If contents aren't visibly contaminated, transfer them to sealed plastic bins. The cardboard goes.
For hard-surfaced items — tools, metal shelving, equipment — spray with disinfectant, wait 5 minutes, wipe down. Soft goods like clothing or rags that show contamination should be discarded. Items without visible contamination can be laundered at the highest appropriate temperature.
Step 6: Walls and Surfaces
Work from the top of the space downward. Spray all surfaces where droppings were found — shelving brackets, exposed studs, ledges. Wait the full 5 minutes before wiping. It's easy to spray and immediately wipe; resist that. The contact time is what inactivates the virus.
If accessible wall insulation shows contamination — droppings embedded in it, nesting material, urine staining — it can't be adequately disinfected. It needs to come out.
Step 7: Floor Treatment
Concrete soaks up liquid, so be generous. A pump garden sprayer is useful for large floor areas. Saturate the surface, allow 5–10 minutes of contact time, then mop up with paper towels or disposable mop pads.
Pay attention to edges, corners, and the areas where storage had been sitting — droppings concentrate there.
Step 8: Bag Everything and Get It Out
All paper towels, disposable PPE, and bagged material goes into heavy plastic garbage bags. Double-bag, seal, and move to an outdoor trash container the same day. Don't leave bags sitting in the garage.
Step 9: Clean Up — Yourself
Remove coveralls by rolling them inward to contain the outer surface. Remove gloves by inverting them as you pull off. Wash hands with soap and water for at least 20 seconds. Shower and change clothes — don't sit in the car or go inside first.
Step 10: Seal Entry Points
Once the area is dry, find and seal how they got in. Common entry points in garages:
- Gaps around pipes and conduit where they pass through the wall
- Corners and bottom edges of the garage door frame
- Cracks in the concrete foundation or floor-wall joint
- Gaps where exterior walls meet the slab
Pack openings with steel wool, then cover with caulk or sheet metal. Mice chew through foam alone — steel wool stops them.
If You Already Swept or Vacuumed
Ventilate the garage immediately — open everything and leave for at least 30 minutes. Then go back in with proper PPE and do the wet disinfection protocol from the beginning. The sweeping or vacuuming has already disturbed the material; what you can do now is minimize further exposure and clean the surface properly.
Monitor for symptoms — fever, deep muscle aches, fatigue — for up to 8 weeks following a significant cleanup exposure. If you were working in an enclosed, poorly ventilated garage for an extended period without a respirator, mention that context to a doctor if symptoms develop.
Official Sources
- CDC: Cleaning Up After Rodents — official cleanup protocol
- CDC Hantavirus Prevention — prevention and disinfection guidelines
Sources & References
- CDC — Centers for Disease Control and Prevention
Hantavirus: Prevention, Symptoms & Control
- cdc.gov — Cleaning Up
https://www.cdc.gov/hantavirus/prevention/cleaning-up.html
- WHO — World Health Organization
Hantavirus Disease: Fact Sheet
All health claims on this page are verified against the primary sources listed above. View our Editorial Policy
Frequently Asked Questions
Medical Disclaimer
The information on this page is for educational purposes only and is not medical advice. If you believe you may have been exposed to hantavirus or are experiencing symptoms, contact a qualified healthcare professional or local health authority immediately.