Cleaning Up Mouse Urine: How to Find It, Disinfect It, and Stay Safe
Mouse droppings are obvious. Mouse urine isn't.
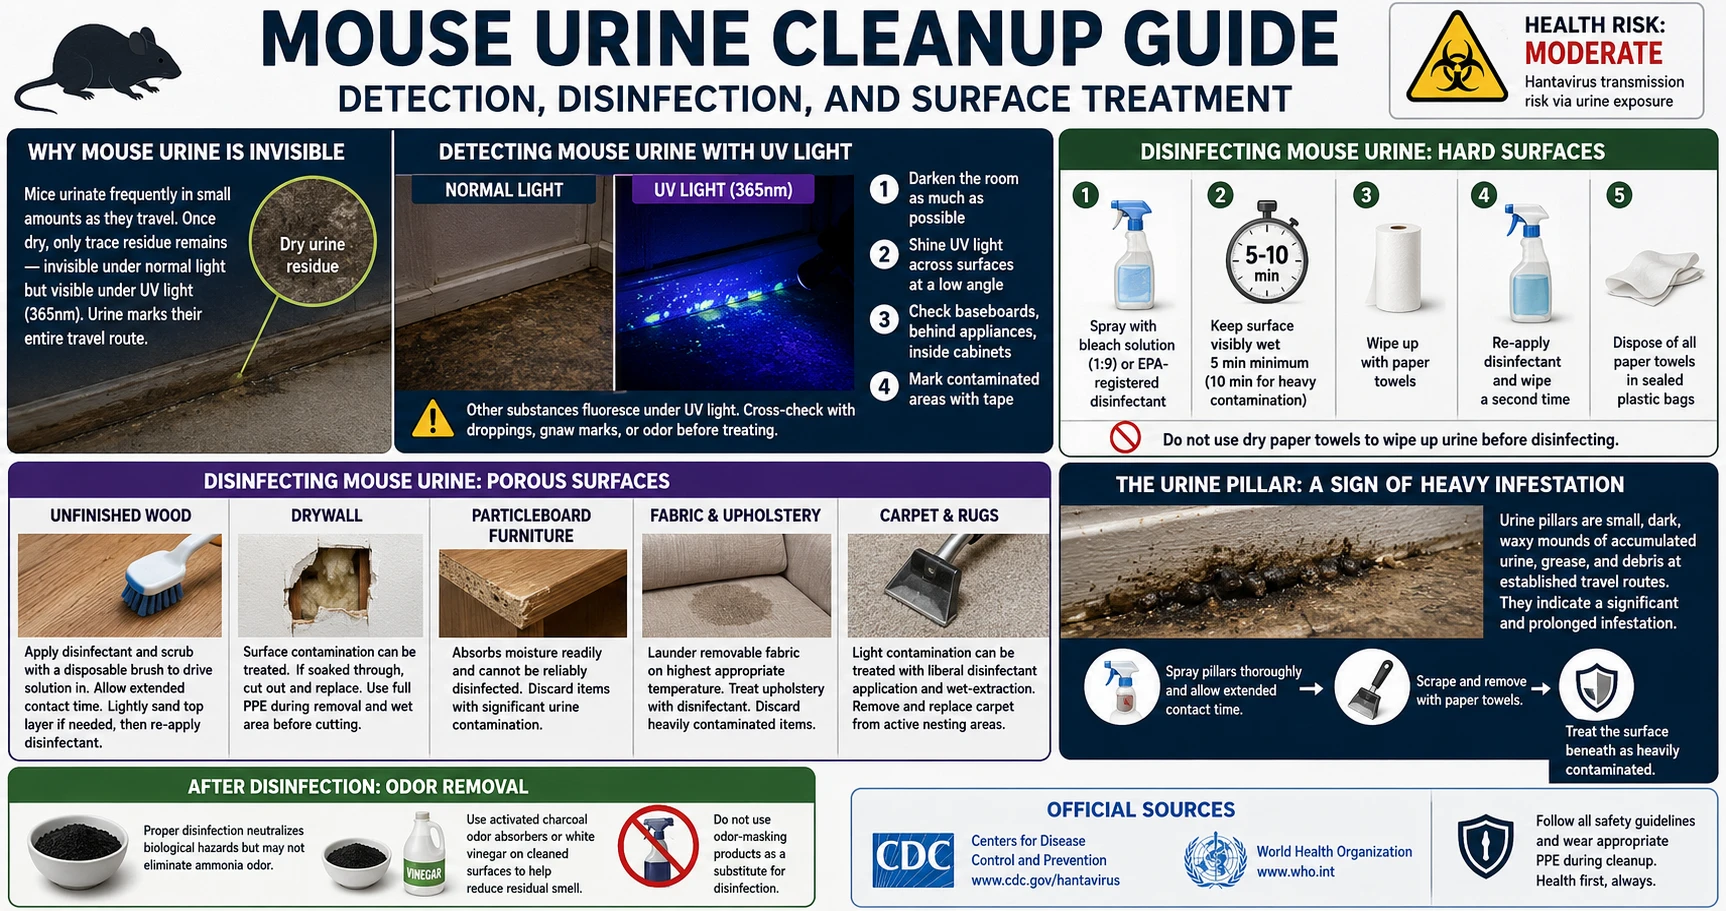
You pull out the shelf liner and there's that faint ammonia smell — or you don't smell anything at all but find droppings clustered along a wall. Either way, wherever mice were active, urine is there too. Mice urinate constantly as they move, leaving trace amounts across their entire travel route. Countertops, drawer interiors, the tops of boxes, the back of the cabinet — every surface they walked is marked. It dries invisible.
The droppings tell you where they went. The urine covers the rest.
Before You Start: What You're Actually Dealing With
Urine from mice doesn't pool in one spot. It's distributed across every path they ran — a thin, dry film you can't see under normal light. You might notice a faintly stale or ammonia smell in an enclosed space like a cabinet or drawer. In open areas, there's often no odor at all until you disturb the surface.
This means the area you need to disinfect is almost always larger than it looks. Treat anywhere mice traveled, not just where droppings were concentrated.
Gloves and an N95 respirator before you touch anything. Spray before you wipe. Those two rules apply to everything below.
Finding It: UV Light Detection
A UV flashlight (black light, 365nm range) costs under $20 at hardware stores. Dried mouse urine fluoresces under UV — typically yellow-green or dull blue-white patches. It's the most reliable way to find contamination that isn't visible.
How to use it:
- Darken the room as much as possible
- Shine the UV light across horizontal surfaces at a low angle
- Check along baseboards, behind appliances, inside cabinets and drawers, and the underside of shelves
- Mark flagged areas with tape so you can treat them once the lights are back on
Some other substances also fluoresce — cross-reference with other evidence (droppings, smell, gnaw marks) before assuming every lit-up patch is urine. But when in doubt in an area with known mouse activity, treat it.
Disinfecting Hard Surfaces
For countertops, floors, shelving, appliances, and other smooth non-porous surfaces, the process is straightforward:
- Spray thoroughly with bleach solution (1 part bleach to 9 parts water) or an EPA-registered disinfectant — the surface should be visibly wet
- Wait at least 5 minutes; 10 minutes for areas with heavy contamination
- Wipe with paper towels
- Spray a second time, wipe again
- Bag all paper towels and seal
Don't wipe dry first. The point is to wet and inactivate before disturbing anything.
Disinfecting Porous Surfaces — and When to Stop Trying
Porous materials absorb urine into their structure. The disinfectant can't fully penetrate what the urine already saturated. Knowing when to clean and when to discard saves time and reduces risk.
Unfinished wood (joists, subflooring, shelving): Apply disinfectant and scrub with a disposable brush to push it into the grain. Let it sit for 10 minutes. If contamination is confirmed and the wood is staying in place, lightly sand the top layer and apply disinfectant again.
Drywall: Surface-only contamination can be treated with spray disinfectant. Drywall that's been saturated — soft spots, staining that goes through — needs to come out. Use PPE during removal and wet the material before cutting to avoid aerosolizing it.
Particleboard furniture and shelving: Absorbs readily, can't be disinfected reliably. If it shows significant contamination, discard it. Don't try to salvage.
Fabric and upholstered furniture: Removable fabric items go in the wash at the highest appropriate temperature. For upholstered furniture — sofas, mattresses, cushioned chairs — spray disinfectant on affected areas and allow to dry. Furniture from an active nesting area, or anything heavily contaminated, should be discarded. A salvageable couch and a compromised one don't look different from the outside; if mice were nesting in or under it, factor that in.
Carpet and rugs: Light, incidental contamination can be treated with liberal disinfectant application followed by wet-extraction. Carpet from an active nesting area should come out. Urine soaks through carpet into the padding and subfloor; the carpet itself being clean means little if the layers beneath aren't.
The Urine Pillar: What It Tells You
In areas with long-term mouse activity, you may find small, dark, waxy-looking mounds along baseboards or behind appliances — "urine pillars," built up from accumulated urine, grease, and debris at established travel routes. They look like a small dark smear raised slightly off the surface.
Finding one means the infestation has been ongoing for some time and that area has heavy contamination. Spray thoroughly, wait a full 10 minutes, then scrape and remove with paper towels. Treat the surrounding surface as heavily contaminated and apply disinfectant to the wood or flooring beneath.
If You Already Cleaned Without Disinfecting First
You wiped the surface with a damp cloth or a household spray before finding this page. Go back over every affected area with bleach solution or an EPA-registered disinfectant — spray until visibly wet, wait 5 minutes, wipe, and repeat. The initial wipe without proper disinfectant may have spread contamination rather than removed it, so treat a wider area than you originally cleaned.
If you worked without gloves, wash your hands thoroughly with soap and water. If you were in a confined space without a respirator — inside a cabinet, under a sink — ventilate and step out. The exposure risk from briefly wiping a surface is low compared to disturbing a nest or sweeping dry material, but proper cleanup from this point forward still matters.
After Disinfection: The Smell
Bleach solution neutralizes the biological hazard but may not eliminate the ammonia odor entirely, especially on porous surfaces. Once everything is dry, activated charcoal absorbers left in the space for several days help with residual smell. White vinegar wiped over already-disinfected hard surfaces can also reduce it.
Don't use odor eliminators or sprays before disinfection is complete — masking the smell doesn't address the contamination underneath.
Official Sources
- CDC: Cleaning Up After Rodents — urine cleanup and disinfection protocol
- CDC Hantavirus Prevention — prevention guidelines
Sources & References
- CDC — Centers for Disease Control and Prevention
Hantavirus: Prevention, Symptoms & Control
- cdc.gov — Cleaning Up
https://www.cdc.gov/hantavirus/prevention/cleaning-up.html
- WHO — World Health Organization
Hantavirus Disease: Fact Sheet
All health claims on this page are verified against the primary sources listed above. View our Editorial Policy
Frequently Asked Questions
Medical Disclaimer
The information on this page is for educational purposes only and is not medical advice. If you believe you may have been exposed to hantavirus or are experiencing symptoms, contact a qualified healthcare professional or local health authority immediately.